Author Topic: A rider ...  (Read 166275 times)

pd

  • Hero Member
  • *****
  • Posts: 3109
    • View Profile
Re: A rider ...
« Reply #180 on: January 05, 2013, 05:24:38 PM »
I did make a little more progress today . My crankcase now has new bearings . :)

I used our grill to heat the unit and finally got it to settle in at about 425° . I let the crankcase sit in there for about 15 - 20 minutes . When I put the hot crankcase on the bench to remove the old bearings , they literally fell out . Thinking that was way too easy , I hurriedly dropped the new bearings into place . They were kind of loose at first , so I quickly inserted the crank , slipped the seal race in place and spun the drive pulley on to hold the bearings where they were suppose to be , until everything cooled .

Prior to all that I had dropped the crankcase into a pine oil bath for a day or so . Pine oil does an excellent job of cleaning aluminum , but it will rust steel in short order . I wasn't worried about the old bearings as they were to be replaced anyway . Pine oil is a little trick I learned a few years ago when having to rebuild a bank of in line four constant velocity carbs for my CB750C . I also soaked that MT9 carb in the pine oil vat after stripping it to bare body . Came out smelling like , well  , fresh pine . ;) And , clean to boot .
You can see the difference . Notice the ends of the carbs were the air filter attaches . The MT9 on the right was simply soaked in the pine oil vat and rinsed with hot water . No more grunge .

« Last Edit: September 28, 2023, 03:07:23 PM by pd »
Goes around , Comes around . :)

Mike Sal

  • Global Moderator
  • Hero Member
  • *****
  • Posts: 1204
    • View Profile
    • Email
Re: A rider ...
« Reply #181 on: January 05, 2013, 05:40:00 PM »
Hmmmm.....Pine oil eh.....I'll give that a try.  I've never heard about that trick before.  Thanks,
Mike Sal

pd

  • Hero Member
  • *****
  • Posts: 3109
    • View Profile
Re: A rider ...
« Reply #182 on: January 05, 2013, 06:00:36 PM »
Mike ,

Use real original PineSol , unless you have access to some higher percentage commercial stuff . The cheaper pine cleaners do not do near as good a job . I've tried them . Some guys use it straight , but I like a watered down solution . About one PineSol to 2 waters seems to work . If you're doing carb bodies , I let them dry and then blow all the passages out with flammable brake cleaner ( the non flammable stuff isn't worth a hoot ) , followed by a good amount of compressed air . I use brake cleaner because it's easy on rubber parts , evaporates quickly and leaves no residue .  READ and heed THE LABEL .
Goes around , Comes around . :)

Ricks

  • Administrator
  • Hero Member
  • *****
  • Posts: 3608
  • 1953 Automatic
    • View Profile
    • Email
Re: A rider ...
« Reply #183 on: January 06, 2013, 07:55:29 AM »
I did make a little more progress today . My crankcase now has new bearings . :)

I used our grill to heat the unit and finally got it to settle in at about 425° . I let the crankcase sit in there for about 15 - 20 minutes . When I put the hot crankcase on the bench to remove the old bearings , they literally fell out . Thinking that was way too easy , I hurriedly dropped the new bearings into place . They were kind of loose at first , so I quickly inserted the crank , slipped the seal race in place and spun the drive pulley on to hold the bearings where they were suppose to be , until everything cooled .


Just like I told you!

I estimated the measurement on the replacement carb today.  As close as I can tell, it is 5/8" through the venturi.  Here are some pictures of it, along with the part #.  Notice the throttle linkage is adjustable, just loosen the screw and move it to where needed.
Rick

pd

  • Hero Member
  • *****
  • Posts: 3109
    • View Profile
Re: A rider ...
« Reply #184 on: January 06, 2013, 08:22:13 AM »
Yup . Just like you told me . Actually the process went a bit better than I had expected as I had the drift and hammer ready for the job of removing the old bearings and only used the hammer handle to bump the new bearings , insuring they were seated . A pleasant surprise . :)

That Carpenter carb seems a pretty close match to the MT48 carb I have . Is that a dual option for the fuel fitting ?
And , the pic of the metering tube is a bit blurry . I can't tell exactly how many sets of holes there are .
Goes around , Comes around . :)

Ricks

  • Administrator
  • Hero Member
  • *****
  • Posts: 3608
  • 1953 Automatic
    • View Profile
    • Email
Re: A rider ...
« Reply #185 on: January 06, 2013, 09:36:08 AM »
Yup . Just like you told me . Actually the process went a bit better than I had expected as I had the drift and hammer ready for the job of removing the old bearings and only used the hammer handle to bump the new bearings , insuring they were seated . A pleasant surprise . :)

That Carpenter carb seems a pretty close match to the MT48 carb I have . Is that a dual option for the fuel fitting ?
And , the pic of the metering tube is a bit blurry . I can't tell exactly how many sets of holes there are .

The carb can be ordered either top or side inlet, but does not have a dual option, because only one is tapped.
The Cushman carb comes with 2 holes, so you must drill 2 more, just like the factory model for the Simplex did.  Look in the manual, part # 886D and you can see them.

I hear you on the bearings. I used a piece of pine to tap mine in, as it is soft and wouldn't scar the bearing if I slipped.
Rick

pd

  • Hero Member
  • *****
  • Posts: 3109
    • View Profile
Re: A rider ...
« Reply #186 on: January 06, 2013, 12:08:11 PM »
I just checked the meter tubes I have .
The left is from the MT48 and the right is from the MT9 .
It seems that the holes in the MT9 are slightly bigger than those in the MT48 .
Also , the position of the holes in the MT48 is higher than those of the Carpenter carb , but , I don't think that would make any difference .


At this point , it seems the MT48 will be the closest to OEM . I guess the final test will be if either carb will actually allow the motor to run and then , how well .
« Last Edit: September 28, 2023, 03:11:18 PM by pd »
Goes around , Comes around . :)

Ricks

  • Administrator
  • Hero Member
  • *****
  • Posts: 3608
  • 1953 Automatic
    • View Profile
    • Email
Re: A rider ...
« Reply #187 on: January 06, 2013, 12:27:08 PM »
I just checked the meter tubes I have .
The left is from the MT48 and the right is from the MT9 .
It seems that the holes in the MT9 are slightly bigger than those in the MT48 .
Also , the position of the holes in the MT48 is higher than those of the Carpenter carb , but , I don't think that would make any difference .


At this point , it seems the MT48 will be the closest to OEM . I guess the final test will be if either carb will actually allow the motor to run and then , how well .


I would use the MT48 and drill two more holes the same size below the two that are already there.  That is what I did to the Cushman carb.  I'd bet you could get it to run on the MT9 tube with no modification, if indeed the holes are slightly bigger.
Rick

pd

  • Hero Member
  • *****
  • Posts: 3109
    • View Profile
Re: A rider ...
« Reply #188 on: January 06, 2013, 02:06:46 PM »
Those were pretty much the same thoughts I had , Rick .
 I thought about trying the MT9 tube in the MT48 carb . Extra holes can always be made . I'll have to compare needles and such to see if anything else is different . The carb bodies look very similar , but the MT48 seems to have an extra hole in the intake just behind the closed throttle plate . I'm thinking that that is part if the idle circuit .

Those meter tube holes look exactly the same in real time as they do in the pic . I'll have to see about getting a drill index and that should tell me what the differences are .

Goes around , Comes around . :)

pd

  • Hero Member
  • *****
  • Posts: 3109
    • View Profile
Re: A rider ...
« Reply #189 on: January 07, 2013, 06:14:50 PM »
I think I've found the color for my bike .

Medium Sapphire Blue Metallic

Here's a sample against the original paint :

« Last Edit: September 28, 2023, 03:13:20 PM by pd »
Goes around , Comes around . :)

Mike Sal

  • Global Moderator
  • Hero Member
  • *****
  • Posts: 1204
    • View Profile
    • Email
Re: A rider ...
« Reply #190 on: January 07, 2013, 07:44:15 PM »
The shade looks right, but did the factory really use any metallics in their paint back then?
Mike Sal

oil-lamp

  • Hero Member
  • *****
  • Posts: 882
    • View Profile
    • Email
Re: A rider ...
« Reply #191 on: January 07, 2013, 07:45:25 PM »
pd

   Thats going to be a looker when your done, what did you settle on the rim color, and are you matching the pully to the rim or tins? ???

Ricks

  • Administrator
  • Hero Member
  • *****
  • Posts: 3608
  • 1953 Automatic
    • View Profile
    • Email
Re: A rider ...
« Reply #192 on: January 07, 2013, 07:55:06 PM »
I don't believe they used any metallic back then.  Simplex was always looking to save money, so they could produce their product as cheaply as possible.
Rick

pd

  • Hero Member
  • *****
  • Posts: 3109
    • View Profile
Re: A rider ...
« Reply #193 on: January 07, 2013, 09:04:09 PM »
It's actually a shade lighter than the original and just a bit brighter .  The metal 'flake' is very fine . In fact , I didn't know it was metallic until I read the label . Knowing the factory would paint a bike any color for an extra fee , I don't think my choice is to much of a stretch .

I think I'll do the rims in Almond , but that's still a maybe . I like the richer tone of the Bright Idea . I want to see how the Almond looks with the Sapphire .
 And , I haven't decided on the pulley , yet . Currently it is bare metal . It does have a nice sheen to it and if it'll match the spokes , I may just clear coat it . I believe it was originally black . That's a possibility .
« Last Edit: January 07, 2013, 09:05:44 PM by pd »
Goes around , Comes around . :)

pd

  • Hero Member
  • *****
  • Posts: 3109
    • View Profile
Re: A rider ...
« Reply #194 on: January 10, 2013, 08:39:35 AM »
The night before last , I tore both the MT9 and MT48 carbs completely apart and soaked the bodies overnight in the pine oil solution . Rinsed them with hot water and scrubbed lightly .
All the brass and needles polished up bright .
A PO had peened the choke plate pivot rod end over the lever on the MT48 , thereby eliminating any possibility of ever using a proper screw that is suppose to lock the lever to the top of the rod .
Of course , the lever was not secured to the rod and was unacceptably sloppy , almost to the point of being nonfunctional . I had little choice but to solder the lever and rod together . Now there is no slop .
I switched the meter tube ( closer to 'spec' ) and both needles from the MT9 to the MT48 as both needles where wrong in the MT48 . The MT48 is the closest 'match' of the two carbs to an MT1 OEM carb .
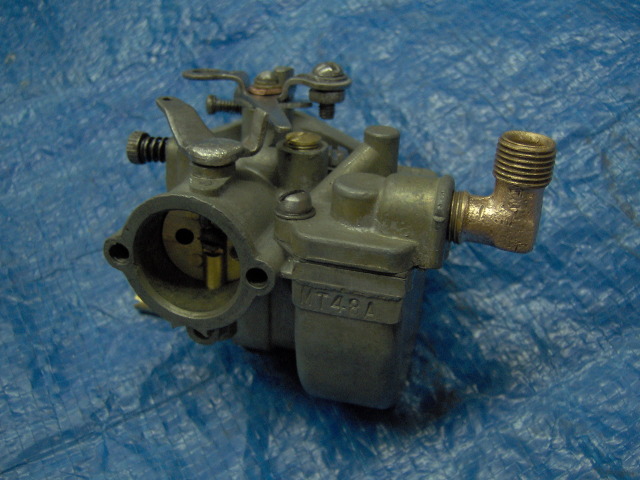
Anyway , here's the finished , ready for service carb ( hopefully , it'll do the job ) and what a days worth of tinkering looks like :

« Last Edit: September 28, 2023, 03:16:22 PM by pd »
Goes around , Comes around . :)